Create an Application
The new RapidIdentity UI provides a streamlined approach to creating an application for Administrators. Many of these tasks were previously available under the General and Extended tabs within Configuration > Applications,
Follow these steps to create an Application in RapidIdentity.
Choose the Applications module from the main drop-down menu and click the Catalog menu.
Click the Add Application or Plus button at the top right of the screen to create a new Application. (Appearance will vary in different browser widths.)


Add Application Buttons
For visibility within this documentation, different sections of the Add Application form have been split into two screenshots. The first section collects general information about the application.
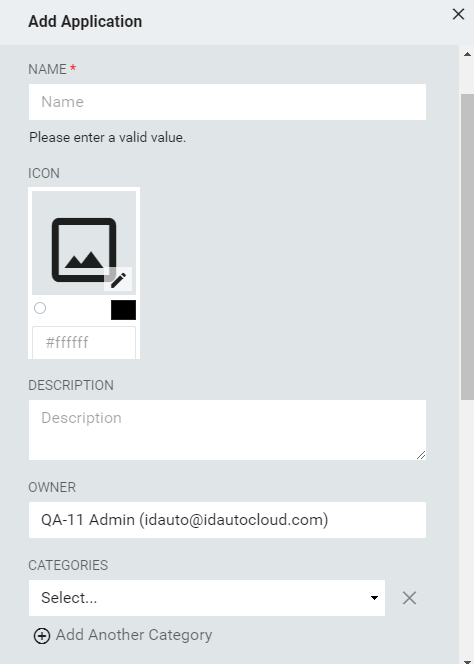
Give the application a name that makes it easy to identify. This is a required field and the application cannot be saved until this field is populated.
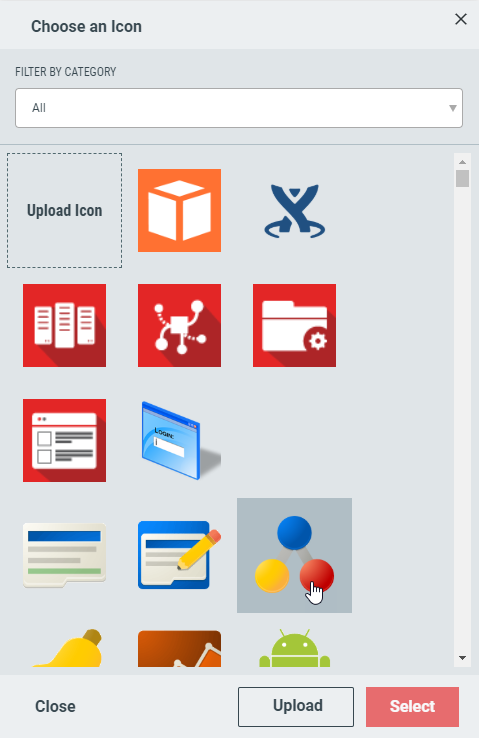
Click the pencil in the icon box to select or upload an image to represent this application. A default library of icons is available, or you can upload a custom icon by clicking Upload Icon and following the upload wizard.
Note
For the best results, use a square icon that is 300px × 300px or fewer and uses a simple design with clear colors. Text, intricate designs, or specialty shapes may distort upon use.
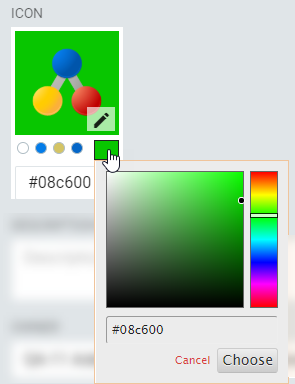
Once an icon is chosen, administrators have the option to include a pre-chosen coordinating background color or to choose a custom color.
Add an optional, brief description of the application.
The Owner field will automatically populate with the identity of the current user. If altered, this field will not retain new settings and will default to the current user.
Choose the Category for this application. Multiple categories can be assigned by clicking Add Another Category and populating the resulting field.

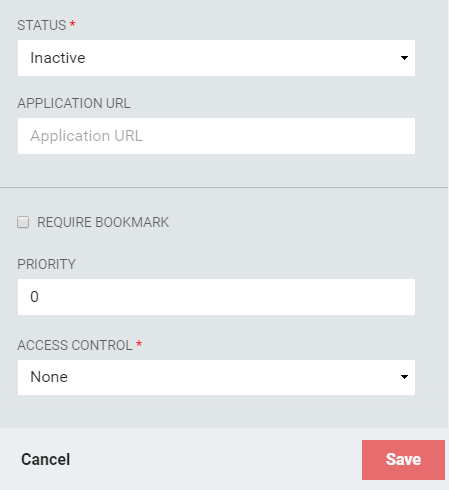
The second section activates and defines the application and its access details.
Field | Description |
|---|---|
Application URL | Required. The application URL. Tokens may be used in the Application URL. All LDAP attributes are valid. |
Application Access | Can be one of three types: Authenticated and Anonymous Users; Anonymous Users Only; or Authenticated Users Only |
Status | Determines if the application icon link will be visible in RapidIdentity Portal. |
Priority | Required. This value allows administrators to determine both the relative order and application icon size users see when accessing My Applications. Assigning priority is very useful when users have access to large numbers of applications, particularly if accessing applications from a mobile device. Applications can have equivalent priority (e.g. 3 applications set to priority 100). |
Require Bookmark | When selected, this application displays in the user's Bookmarks in the Dashboard module. |
Access Control | Choose whether to provide the application as Role-based or Attribute-based. |
To activate this application, use the drop-down menu Status to Active. This setting also fully enables/disables the application definition, determining whether the application link will be visible in RapidIdentity Portal.
Insert the URL required to access the application
Check Require Bookmark to force this application on all qualified users' Dashboard and Bookmark filter in their My Applications view.
The Priority value allows administrators to determine both the relative order and application icon size users see when accessing My Applications. Assigning priority is very useful when users have access to large numbers of applications, particularly if accessing applications from a mobile device. Applications can have equivalent priority (e.g. three applications set to priority 100).
Choose how or if to limit the visibility of the application. This field defaults to None.