Create a Sponsored Account
To create a new sponsored account, click Add Person.
A popout menu opens and the Sponsor can enter user information for the sponsored account. All fields with a red asterisk are required, which subsequently enables the Create action button. The expiration date must be within a 90-day range of the current date.
 |
When finished, click Create. The new sponsored account then displays in the sponsored accounts table.
Once the sponsored account is created, an Email notification is sent to the new Sponsor. This email informs the Sponsor of the newly created login ID and password. Below is a sample of the email notification.
 |
Duplicate Identification
First Name
Last Name
Email Address
When configured to detect duplicate entries based on any or all of the chosen attributes, clicking the Create button will trigger the Sponsorship Module to identify sponsored accounts based upon the attributes the system administrator selected. If a match is found, RapidIdentity displays Duplicate Account in the sidebar.
Click Close to return to the Create Sponsored Account sidebar to modify the account and then click the Create button to create the sponsored account.
Edit a Sponsored Account
Editing sponsored accounts currently only takes place in the legacy user interface and will be integrated into the new user interface shortly.
Enable Configuration to Create Sponsored Accounts
There are several configuration considerations that must be completed prior to enabling authorized users to sponsor an account.
Configure system Roles for Sponsorship Admin and Sponsorship Sponsor.
Enable Configuration to ensure sponsored accounts are created in the appropriate OU.
Configure Sponsorship module attribute settings.
Define custom attributes and verify functionality for a new sponsored account.
Populate email addresses for authorized users to sponsor an account
Sponsorship Settings
Access the People Module from the RapidIdentity Portal.

Select My Sponsored Accounts or Other Sponsored Accounts.
Click the Settings gear in the left-hand menu items.
Click Sponsorship Settings.
Complete the information as shown below in the Sponsorship Settings General tab:
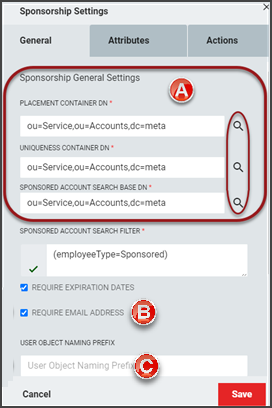
Click the browser Icon and select from the LDAP Containers for the following fields:
Placement container DN: OU, DC, DC format
Uniqueness Container DN
Sponsored Account Search Base DN
Require Email Address : Set to "True"
User Object Naming Prefix: Set the naming prefix format
From the Sponsorship Settings Attributes tab complete the following:

Use User Name In Duplicate Matching Filter: True
Click Save.
Select My Sponsored Accounts or Other Sponsored Accounts.
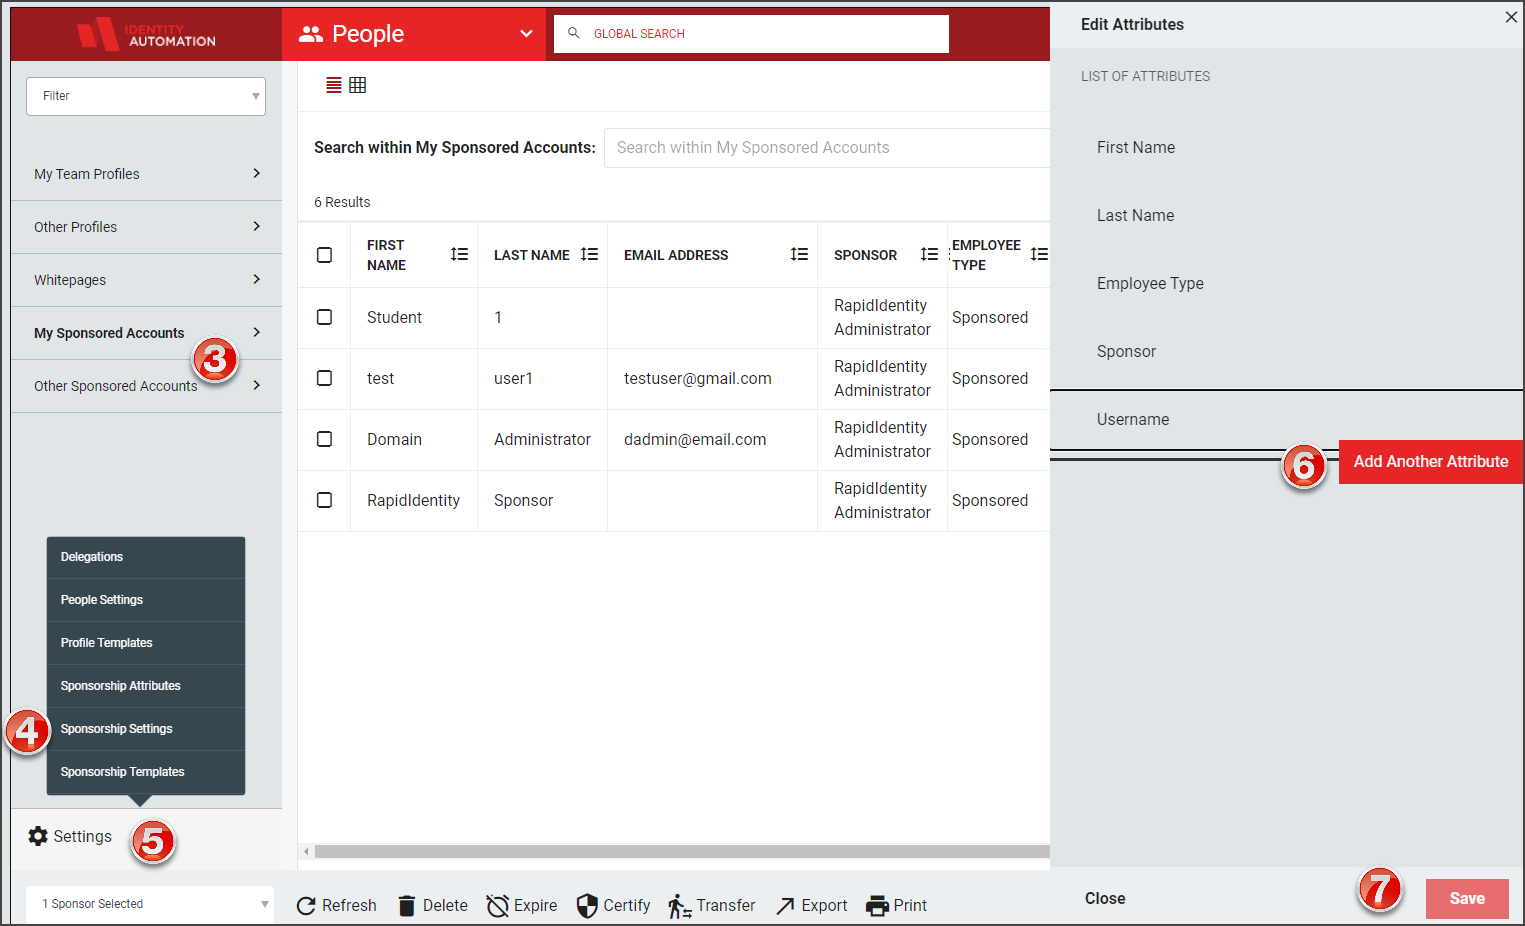
Click the Settings gear in the left-hand menu items.
Click Sponsorship Attributes.
Add additional specific attributes to the form that will be required for a sponsored account, as required.
Click Save.
Populate email addresses for authorized users to sponsor an account
All users that are authorized to sponsor an account must have an email address populated for their account to receive Sponsorship Account Management notifications.
Edit the Administrator email address through Delegations, Refer to Edit a Delegation for additional information. If the email address is not available, update the Delegations Profile to show in the list:
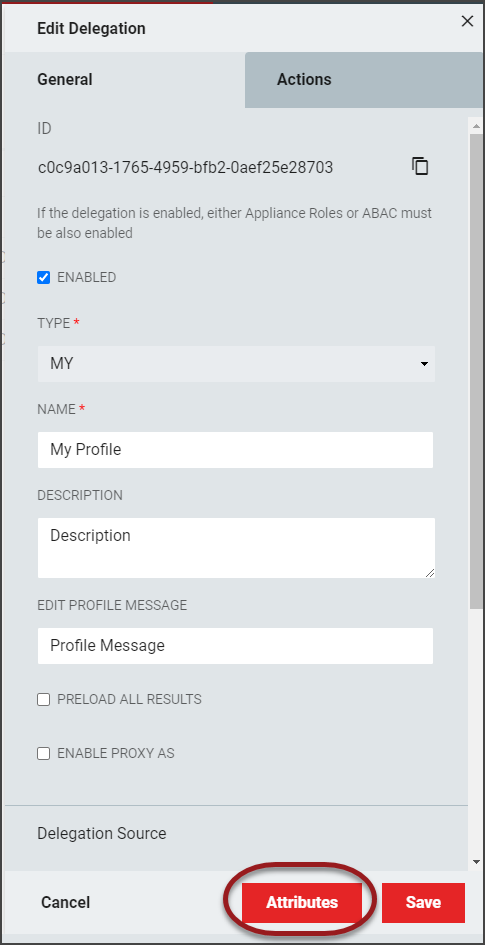
From the People module, select Settings, Delegations.

Select the My Profile from the Delegations workspace and click Details.
From Edit Delegation, click Attributes.
From the Attribute Map, select to Edit the "Email" attribute.

Note
The user that is assigned the email address is the Sponsor of the accounts.
Select to Allow Editing and Show In List checkboxes.
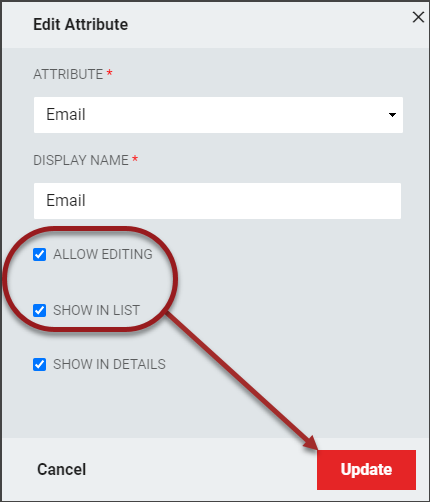
Click Update to return to the Attribute Map. Click Update again to return to the General tab.
Click Save.
Note
Once sponsored accounts are set up, an administrator will still need to create additional delegations. For managing certain aspects of sponsored accounts, see Delegations .
Other Considerations
Add the users to the Sponsored Account roles and ensure that the settings are synchronized in the Roles Module. Setting up Auto-synchronization in production environments will prevent individual syncing of the roles.
When logging in to the portal as a sponsored account the Administrator would set the Password Policy Manager to use a role-based policy for Sponsored Accounts, as well as the Sponsored Account Password Policy.

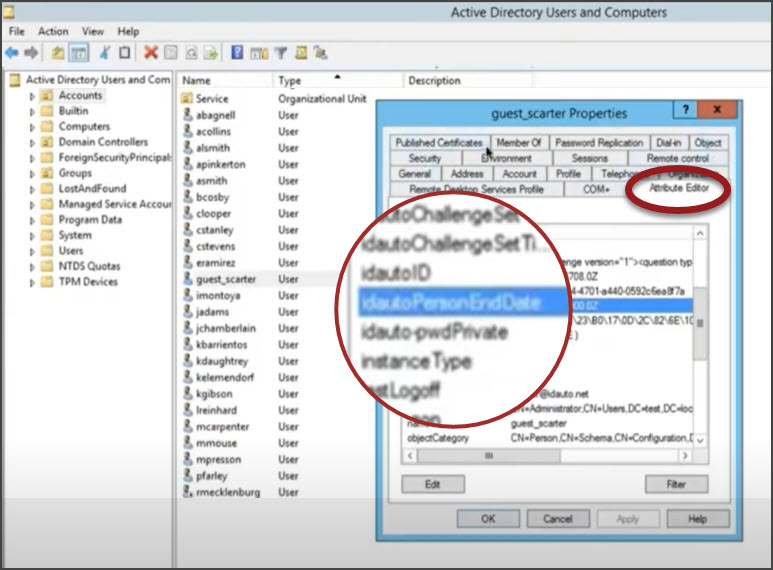
In the Active Directory Users and Computers Attribute Editor Properties, check the date start and end dates for the user.
Set up Appliance SMTP configurations.
Certify Sponsored Account
The “Certify” process is used to Certify sponsored accounts. Since all sponsored accounts are configured to expire, the certification process can extend or reduce the expiration date. Accounts can be certified regardless of the current status (Expired; Expiring Soon; Active). When certifying an expired account, authentication is enabled immediately.
 |
Sponsors receive email notifications on a nightly basis when they have sponsored accounts in the “Expiring Soon” status. If the Sponsor does not take action, those accounts will expire on their expiration dates.
To certify an account, select the appropriate account and click Certify.
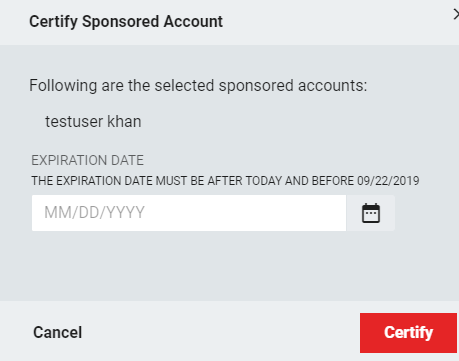
RapidIdentity opens the Certify Sponsored Account sidebar and Sponsors can use the date selector or enter a new expiration date at least one day into the future. After the date is entered, click Certify.
 |
After the Certify process completes, the Expiration Date and Status updates. RapidIdentity displays a notification to confirm the Certify process was successful.
An email notification is automatically sent to the sponsor to communicate that a certification action has occurred.
Expire Sponsored Account
All sponsored accounts have an expiration date. The Sponsor can choose to certify the sponsored account by setting a new expiration date or let the account expire. If the sponsored account expires, RapidIdentity will not let that user authenticate successfully.
The "Expire" process is used to expire and disable the target sponsored account. Once expired the sponsored account is disabled, authentication is no longer possible. To expire an account, select the appropriate data grid checkbox(es) and click Expire.
 |
Sponsored accounts can be expired individually or in bulk. Expiring a sponsored account terminates authentication credentials immediately.
 |
An email notification is automatically sent to the sponsor to communicate that an expire action has occurred.
At midnight, all accounts listed in the directory service with an expiration of that day are disabled immediately. This process ensures automated sponsored account de-provisioning.
On a nightly basis, the Sponsorship Module checks for accounts with the status “Expiring Soon”. This status is based on accounts expiring within 7 days. If a sponsor has one or more accounts in the Expiring Soon status, the Sponsor will receive one email.
Transfer Sponsored Account
The "Transfer" process is used to transfer sponsored accounts to a different sponsor. This feature is helpful when a temporary user now reports to a different person or department. Instead of creating an additional account, the account can be transferred to the new Sponsor.
 |
To transfer a sponsored account, select the appropriate user and click Transfer. Enter the name of the new sponsor in the box and click Transfer to complete.
 |
The Sponsorship module will display the Transfer Sponsored Account sidebar. A new sponsor can be identified by entering the new sponsor's name into the Sponsor field.
Once a different account is selected to Sponsor the sponsored account and Transfer is clicked, the sponsored account is transferred, RapidIdentity removes the sponsored account from the sponsored account table, and provides a notification stating the transfer process was successful.
Sponsored accounts can be transferred individually or in bulk. Sponsored accounts are transferred to the new sponsor immediately.
An email notification is automatically sent to the previous and new sponsor to communicate that a transfer occurred.
Export Account Information
Users with direct reports can choose to export all visible accounts to a CSV file by clicking Export. This option is available on My Team Profiles, Other Profiles, Sponsored Accounts, as well as any custom delegations the system administrator has set up; the feature functions the same way in each location.
 |
The .csv export file will include all of the accounts listed in the workspace (you may filter the results to narrow the pool by using the Search bar at the top of the workspace). Formatting includes the headings configured to show in the page's workspace as well as the account status for each account.
 |
Print Account Information
Users with direct reports can choose to print all visible accounts to a PDF or network printer by clicking Print. This option is available on My Team Profiles, Other Profiles, Sponsored Accounts, as well as any custom delegations the system administrator has set up; the feature functions the same way in each location.
 |
The printout will include all of the accounts listed in the workspace (you may filter the results to narrow the pool by using the Search bar at the top of the workspace). Formatting includes the headings configured to show in the page's workspace as well as the account status for each account.
 |
Delete Sponsored Account
The “Delete” process is used to delete the sponsored account permanently. Once deleted, the sponsored account is removed from the directory irreversibly.
 |
The Expire action is a safer choice because the selected account is disabled but still is stored within the directory.
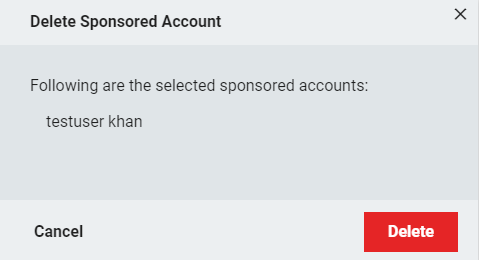
Sponsored accounts can be deleted individually or in bulk. To delete a sponsored account, click the checkbox next to the account to be deleted and click Delete.
 |
After the Delete process completes, the sponsored account is removed from the sponsored accounts table and RapidIdentity displays a notification to confirm the Delete process was successful.
An email notification is automatically sent to the sponsor to communicate that a delete action has occurred.